Is Digital Art “Real” Art? Facts and Myths About Digital Creating

When you look at beautiful digital art and compare it with the things you draw with a pencil, you can feel astonished and belittled. If only you could afford a graphics tablet, you could be just as good! And if you already have a tablet, your thought is, “If only I could afford Photoshop! So many amazing things can be done with this software.”

This is probably why there’s a misconception that digital art isn’t real art. After all, a real artist needs to learn all these hard things, master pencils, brushes, color mixing, different kinds of pigment, and they can’t just undo a mistake! And when they finish, their art is one of a kind, it exists physically, it’s not just an array of digits that you can copy infinitely. At the same time, a digital “artist” buys some expensive equipment and that’s all—they can now produce outstanding art. That’s cheating, isn’t it?

If that’s your point of view, keep on reading. If you’ve never tried digital art, you’ll learn what it’s about. If you have, but you’re poor at it, I’ll tell you why. In both cases I’ll clarify the misconceptions that may have been bothering you for a long time.

Sculpting, Drawing, Painting, Digital Art

There are lots of methods of recreating the real world in some small form. You can take a soft mass and mold it. You can take something harder and sculpt it. You can make thin rows in sand to represent the outlines of something. You can take a sheet of white paper and create smudges with a small bit of charcoal. You can make blobs of color to imitate patches of light and shadow. The weird thing is that we don’t have a word for all these activities. It’s not really “creating”—we don’t create a thing, we create an image of it. In the end, we tend to call it sculpting (for built forms) and drawing (for shapes on paper). People more familiar with art add another category to it, painting, to distinguish it from line-based works.

Not so long ago another category appeared—digital art. The computer has turned out to be a powerful tool for an artist. It provides a clean workspace, with the freedom to make mistakes. It’s so powerful that traditional artists have started to look at it as some kind of unfair extension. One pen instead of a bunch of pencils with different softness, all the brushes that need to be cleaned all the time, charcoal, ink and whatever you’d like to use? One machine for every size, shape and material of canvas, for every color and way of blending? Everything neatly placed on your desk, with the option to save for later? A dream tool for lazy people!

Computers are also well known for their function of automating boring and time-consuming processes. For example, you give it ten big numbers to multiply, and get a result without any effort on your side. In the same way you can create a brush (one not similar to anything traditional) of a tree, and create a whole forest with simple clicks. Click, click, click—and there you are, every tree perfectly detailed. All in a matter of seconds. Want to create a gradient for the sky? No problem—select white and blue, and it just creates itself. Did the character turn out to be too small? Don’t worry, just scale it. Or use a special deform tool to change its shape without having to draw it again. Everything without affecting the background—we’ve got layers, after all. It’s too easy. Too easy to be called art.

21

Try to do the same with traditional painting!
Here’s the problem: a computer isn’t an art tool. It’s not a substitute for a brush, or canvas. It’s a set of tools that lets you create an image of reality in the same format as photos. That’s all. Does it make the creation process more convenient? Yes. Does it make it easy? No.

To understand it, you need to get familiar with the concept of art media.

Traditional Media

Sculpting

In sculpting you use some solid material to create a 3D object, usually resembling something known from reality (or imagined reality, like movies or books). These materials should be prone to some kind of crafting so that their form can be adjusted. These are materials like:

  • Clay
  • Stone
  • Metal
  • Plastic
  • Bone
  • Wood
  • Ice
  • Glass

22

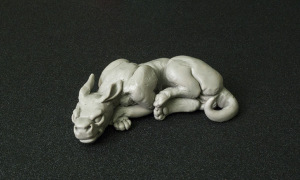
Sculpture—Super Sculpey polymer clay, toothpick

Drawing

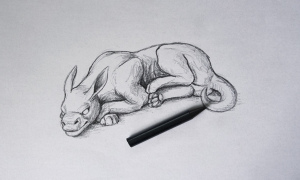
In this method the outcome is made of lines that symbolize some form known from reality. It’s characteristic that dry media are used—you need to make the blending yourself with lines or a kind of dithering. Almost any material can be used for it, as long as it’s applied with a pointed stick on a material that can keep it for a time (paper, wood, or the human body).

  • Graphite
  • Marker
  • Ink
  • Crayon
  • Paint
  • Pastel

24

Traditional drawing—Progresso woodless pencil, 8B

Painting

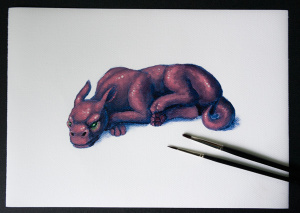
In English, “painting” and “drawing” are often used as synonyms. However, a simple distinction can be that we use sharp lines for drawings and blobs/patches of paint for paintings. Overall colors, light and shadow, and the shapes made by it are more important here than clear outlines. Wet media are usually used, and the blending tends to occur naturally. For painting we can use:

  • Oil paint
  • Acrylic paint
  • Gouache
  • Ink
  • Tempera
  • Watercolor
  • 25

Traditional painting—acrylic paint, canvas paper, two brushes

Digital Media

Digital media will be everything that has a digital outcome, that is, “in the form of digits”. When you take a photo of your painting, it becomes digital too (of course, only the photo, not the physical original). That’s what links all digital creations—nothing more. We still can distinguish other categories here:

Sculpting

Digital sculpting is about creating 3D models of something known from reality with a software that provides tools for it. The models can be textured and colored, and presented in a light that resembles a realistic environment. Finished works can be brought into a traditional form with a 3D printer.

Drawing

Digital drawing can be created with software that lets the user create dots of various diameter, which transform into lines. Additionally, other features can be used, like colors, erasers, and the transformation of drawn lines. Finished works can be then brought into the “real world” by printing.

Painting

Digital painting requires software that provides tools for creating patches of color and for blending them. Painting programs are usually a more advanced form of drawing software.
Tips to Help You Properly Mix Text With Imagery

The pattern of using text on top of background images has been popular for years. Originating well before web design, text on an image can provide a more emotionally engaging and contextually rich experience. Before present day, images had to be much smaller to allow for significantly slower bandwidth. As connection speeds and screen densities rapidly increase, we are opened up to using much larger images in our designs.

Design decisions related to this technique are incredibly important to consider, and developing best practices to govern this practice is imperative to retaining high quality design. One cannot simply place text over any image and expect it to look right.

In this article, we will discuss five different aspects of placing text over images that will help you properly mix copy and imagery.

Note: throughout the article, the same principles apply when choosing video and text combinations.

1. Contrast Through Color and Brightness

Using images that have significant contrast with the text is imperative. In particular, using darker images with lighter text, or darkening images with filters or an overlay element, can be an effective way to ensure you are utilizing enough contrast.

Some tips to achieve proper color and brightness contrast:

  • If you can’t immediately see the letterforms, your contrast is off.
  • Contrast does not always mean dark versus light; complementary colors also provide natural contrast.
  • If the image is complex and fully in focus, utilizing an overlay or editing the image will likely be the mos t effective option.

12

2. Contrast Through Sizing and Positioning

Color isn’t the only way to improve the contrast of an image in relation to overlaid text. Choosing text size and position with relation to the focused elements of the image is essential, as this relates to the readability of the text itself.

In this example, we have chosen an image with a large, relatively homogenous sky area. This is a perfect area to place text. In contrast, a much less readable positioning of the text would be directly in the center of the image, where the skyline appears.

13

3. Readability Through Depth

Choose an image that utilizes depth of field. This will allow a smoother backdrop for text, which will increase readability. Place your text on the out-of-focus portion of the image, and be certain that the text color contrasts adequately with the primary color of the out-of-focus area.

We can do this easily by positioning text in areas of lower focus, as in this example

14

4. Image Subject Choice

Text over imagery is only as effective as the inferred meeting from the combination. For instance, don’t choose generic imagery if more specific imagery will more adequately communicate. When choosing images, consider the emotional evocation and literal context of the image, especially as it relates to the tone of the message the copy is intended to convey.

Some tips:

  • Choose images that show a full sentence; the user should clearly see the subject of the image, and understand the action being taken in the image, if any.
  • Don’t choose images that have a weak point of focus.

Keep in mind the importance of clarity in the image. If the image is more or less for evoking feeling and less about the details, heavy overlays or filters may be applied without losing the effectiveness of the image

15

4. Image Subject Choice

Text over imagery is only as effective as the inferred meeting from the combination. For instance, don’t choose generic imagery if more specific imagery will more adequately communicate. When choosing images, consider the emotional evocation and literal context of the image, especially as it relates to the tone of the message the copy is intended to convey.

Some tips:

  • Choose images that show a full sentence; the user should clearly see the subject of the image, and understand the action being taken in the image, if any.
  • Don’t choose images that have a weak point of focus.

Keep in mind the importance of clarity in the image. If the image is more or less for evoking feeling and less about the details, heavy overlays or filters may be applied without losing the effectiveness of the image

16

Know Basics of Graphic Design World

The development of modern Graphic Design like this is very dependent on technical devices that support the application and exploration of a work of DG. So many emerging digital graphics processing device that is easy in operation and high levels of exploration, which we call the present computer graphics. Computer graphics in the realm of the very basic operations as stock once a Graphic designer in his professional work. While not quite in the DG operations also require management as a continuum in the process of creation of a work of DG. Next we discuss what it‘s operations and management in DG.

2

operational DG

Tool or device used a Graphic Designer at the present time this is a computer that has the special ability to process a variety of materials and component design. Computer specifications are particularly important to produce good work anyway. Here’s a computer device which can be divided into 2 categories:

1 Hardware

Computer hardware that is commonly used in the professional practice of a graphic designer is a set of minimum Pentium 4 PC, memory can process data quickly, the ability VGA (video graphics adapter) good, good screen close to the color printing (CMYK), and other enhancements such as, scaner and printer.

2 Software

Software or graphics processing program very many choices there are paid some are free, while usually the selection of graphics processing software adapted to the prevailing trend. Here’s a graphic processing software commonly used at present with particular specifications.

Photoshop: as a bitmap-based graphics processing units or pixels. Usually to process images and visual effects exploration.
Illustrator / CorelDraw: vector-based graphics processing unit or line. Normally for the manufacture logos, clipart and PopArt.
Flash / Swish: for the manufacture of motion vector-based graphics. Usually to make animated cartoons, light gaming and multimedia advertising.
Aftereffect: Making a bitmap-based motion graphics with exploration of real effect. Normally for the manufacture of motion graphics for TV or video needs.

Design a CD Cover in Low-Polygonal Grungy Style in Adobe Illustrator

1

Ever wanted to make your own stylish CD cover? In this tutorial, we’ll go through a process of creation of a stylish CD cover, with simple yet modern styled graphics.

We will use the popular low-polygonal style, and give our cover a unique grungy look with the help of Adobe Illustrator artistic brushes. Together, these elements will help our CD cover have a modern look and stand out among the crowd of other albums.

Let’s start!

1. Create a Low-Polygonal Base for the Elephant’s Head

Step 1

For this tutorial, I’ve used one of my old pictures (which you can download directly below by right-clicking on the image) that I File > Place on the Artboard as a reference. Lock the layer with your reference image and create a New Layer above the locked one.

2

Step 2

I make the reference image a bit brighter, and started drawing small triangles above it using the Pen Tool (P).

3

Step 3

Continue covering the reference image with triangles of various sizes. You don’t have to be very precise here. Don’t waste your time trying to make the triangles match, because later we’ll do an easy trick in a few clicks.

4

Step 4

If your image is more or less symmetrical, try using the Reflect Tool (O) to mirror some repeating parts to the other side of your image. Here, for example, I select a group of triangles around the eye-area and reflect it over the vertical axis. Use the Copy button to make a reflected copy of the selected area.

5

Continue rendering your image. Make the triangles larger to emphasize the large pieces, such as the wide upper part of the elephant’s trunk. Use smaller triangles to highlight the minor details such as eyes and tusks.

6

Step 5

Finish up with the elephant’s trunk by covering it with a set of varying triangles.

7

Step 6

Move on to the ears by putting some triangles over the left ear. Make the sides of the triangles longer to indicate that the shapes here are more extended and protruded.

8

When you are finished with one of the ears, use the Reflect Tool (O) again to copy the reflected objects to the other side of our image. Edit some triangles by changing their size and position if they are off the area.

9

Step 7

The base for our low-poly illustration is ready! I’ve changed the Stroke Color of the triangles to bright red, to see them more clearly.

10

Step 8

Now the fun part! Find a group of triangles which you need to merge, so that they would fit nicely to each other. Select the corners of these triangles by dragging the Direct Selection Tool (A) over the anchor points or by using the Lasso Tool (Q). Focus on the Align Panel (Window > Align) and choose the Align to Selection option. Finally, click on the middle positions in Align Anchor Points and Distribute Anchor Points fields in order to combine the triangle corners.

`12

Step 9

Move on to the next group of corners which you need to combine.

14

Step 10

If it happens so that your triangle don’t combine, like in the example below, just go ahead and add an additional triangle by dividing the big one into two separate shapes, and align the anchor points in the same way.

15

Edit the shapes on the elephant’s face.

16

2. Color the Elephant Using the Live Paint Bucket

Step 1

When all the triangles are aligned nicely to each other, select everything and go to Object > Live Paint > Make.

17

Step 2

Use the Eyedropper Tool (I) to pick the color from the reference image and then fill the shape with the selected color, using the Live Paint Bucket (K). Use the Alt key to switch between these two tools, thus speeding up your work.

18

Step 3

Here is how the fully colored image looks at this stage. Some triangles are made much darker than the others to emphasize the shadows and to make our illustration more dimensional. The brightest shapes mark the highlights on the most protruded and bulged shapes.

19

Step 4

Remove your reference image and set the Stroke Color to None after you’ve finished coloring all the shapes. Fill in the blank missing parts if there are any.

20

You may notice that some of the triangle’s sides do not match. This may happen while using the Pen Tool (P), if you accidently click and drag, thus making a rounded smooth corner instead of a sharp corner. Don’t hesitate and edit the anchor points with the Convert Anchor Point Tool (Shift-C) by clicking on the anchor points in order to convert them to sharp corner.  

31

Step 5

As long as you are satisfied with the result, select several random shapes with Direct Selection Tool (A) and change their color to lighter and darker gray in order to make our image more intricate and stylish.

32

3. Design the Front Part of Your CD Cover

Step 1

Create a New Layer below the layer with the elephant’s head. Place the completed head over the blank CD-cover template. Keep the elephant’s head on a separate layer, so that you are able to add new objects behind it.

33

Step 2

Let’s create a nice grungy background. We don’t want it to be too distracting, but at the same time still want it to highlight the main object, making the cover look trendy and minimalistic. Stick to gray monochromatic tones, so that the elephant’s head will remain the only bright and eye-catching object of our composition.

We’ll use some default Adobe Illustrator brushes, which you can find in the Brush Libraries Menu > Artistic > Artistic Watercolor and other from the same section. See the list of the brushes which I’ve used on the screenshot below.

34

Select some watercolor brushes to your liking and make several strokes with the Paintbrush Tool (B) in different directions.35

Step 3

If some of the lines are off your drawing area, you can always hide the unneeded parts by duplicating the basic cover shape, placing it above the brush strokes and making a Clipping Mask.

37

Step 4

Continue filling up the background by using various ink splash and splatter brushes, varying their darkness.

38

Step 5

Move from the center of the cover to the edges, adding smaller details and filling up blank spaces.

39

Step 6

I added a thick charcoal stroke at the bottom of the cover, assuming it as a good spot for some text.

40

Step 7

Add more details by using other brushes from the list. Choose lighter shades of gray in order to make the overall composition airy and light.

41

Step 8

Create a New Layer above the layer containing the elephant’s head. Make a few strokes with artistic brushes and switch the Blending Mode to Color Burn to add a nice touch of blue to our elephant.

42

Use the Clipping Mask again to hide the unneeded parts.

43

Step 8

Inspired by Indian and military facial warpaint, I decided to add a big stroke across the elephant’s eyes. Object > Expand Appearance, converting your stroke into a separate object, and switch it to Multiply Mode, lowering the Opacity down to 20%.

44

Step 9

The last but not the least thing to do here is to add a gentle shadow under the elephant’s head in order to make it more dimensional and to separate it from the background. Go to Effect > Stylize > Drop Shadow and play with the settings to your liking. You can find my settings on the screenshot below.

45

Fantastic Job!

Congratulations, you’ve just completed designing the front part of our CD cover! I hope it was a useful experience for you. Good luck with making your own unique CD cover design!

48

Community Project: Vector Wire Frames Showcase

Community Project: Vector Wire Frames Showcase

Today we bring you the results of this project, with diverse entries ranging from the simple to the beautifully complicated.

So, what’s a vector wire frame you ask? A vector wire frame is the special outline mode in Adobe Illustrator that allows you to see an alternative version of your current work in progress.

Vector Wire Frames Created by You!

Enjoy these incredible wire frames presented by our readers. Show them some love in the comments section and let us know if these helped you understand a little bit more about vector art!

Candice McCown

16

17

I’m a Senior Graphic Designer here in the U.S. and a passionate oil painter. Most of my vector work is done at work or in my spare time. I am entirely self-taught from a lot of the wonderful tutorials here on Tuts+ over the past couple of years. I am attaching my Christmas card that I made for 2014, which features my watchdog in the window spotting Santa. Believe me she is part-human part-cat with a touch of dog.

18

19

New Course: Drawing Fantasy Creatures Digitally

Our new course, Drawing Fantasy Creatures Digitally, will teach you how to draw two creatures of pure imagination: a centaur and a dragon. The element of fantasy presents some challenges, such as lack of photo references, but on the other hand we have the opportunity for more creative expression.

14

What You’ll Learn

In this course, professional graphics artist Kirk Nelson will take you through the full, step-by-step workflow for drawing fantasy creatures using Adobe Photoshop. The instruction blends traditional drawing techniques with modern digital workflows. You’ll start by forming a basic sketch, and then you’ll start adding more details, shading, light and shadow, and final effects. Kirk will give you detailed practical instruction every step of the way.

15

Vector Community Project: Show Us Your Wire Frames!

Everyone loves a taste of the behind the scenes magic of creating incredible art. And in this quick Tuts+ project, we want the vector community to give us a little peek into your process by showing your own vector wire frames.

What is a Vector Wire Frame?

When working in Adobe Illustrator, you can always choose to view your art in the outline mode. These outlines allow us to see a more simplified version of the extensive work that goes into creating your vector masterpiece.

How to Enter this Community Project:

  1. Upload both the original vector artwork plus the wire frame version to the comments section. Upload each work separately and Save for Web with a fixed width of 600 pixels.
  2. Include your name, website, or a short bio to help us learn more about you or your vector process!

Guidelines

  • Upload both the original work and wire frame versions to the comments section in order to be included in the community showcase. The deadline for submissions is September 30th, 2014.
  • All art must be 100% of your own work.
  • This project is only open to the vector community. But don’t worry! We’ll have more exciting projects coming soon to challenge the rest of our entire Design & Illustration community!
  • When you publish your artwork on this article, you agree that the graphic can be included in one or more articles on Tuts+ and perhaps shared with other readers on the Tuts+ network via social media.
  • It’s really that easy! So submit and have fun!

Wire Frames From Our Authors

This community project wouldn’t be complete of course without a little inspiration from our own talented authors. Check out these great before and afters of their original artworks and wiref rame versions.12

13

Is Digital Art “Real” Art? Facts and Myths About Digital Creating

When you look at beautiful digital art and compare it with the things you draw with a pencil, you can feel astonished and belittled. If only you could afford a graphics tablet, you could be just as good! And if you already have a tablet, your thought is, “If only I could afford Photoshop! So many amazing things can be done with this software.”

This is probably why there’s a misconception that digital art isn’t real art. After all, a real artist needs to learn all these hard things, master pencils, brushes, color mixing, different kinds of pigment, and they can’t just undo a mistake! And when they finish, their art is one of a kind, it exists physically, it’s not just an array of digits that you can copy infinitely. At the same time, a digital “artist” buys some expensive equipment and that’s all—they can now produce outstanding art. That’s cheating, isn’t it?

If that’s your point of view, keep on reading. If you’ve never tried digital art, you’ll learn what it’s about. If you have, but you’re poor at it, I’ll tell you why. In both cases I’ll clarify the misconceptions that may have been bothering you for a long time.

Sculpting, Drawing, Painting, Digital Art

There are lots of methods of recreating the real world in some small form. You can take a soft mass and mold it. You can take something harder and sculpt it. You can make thin rows in sand to represent the outlines of something. You can take a sheet of white paper and create smudges with a small bit of charcoal. You can make blobs of color to imitate patches of light and shadow. The weird thing is that we don’t have a word for all these activities. It’s not really “creating”—we don’t create a thing, we create an image of it. In the end, we tend to call it sculpting (for built forms) and drawing (for shapes on paper). People more familiar with art add another category to it, painting, to distinguish it from line-based works.

Not so long ago another category appeared—digital art. The computer has turned out to be a powerful tool for an artist. It provides a clean workspace, with the freedom to make mistakes. It’s so powerful that traditional artists have started to look at it as some kind of unfair extension. One pen instead of a bunch of pencils with different softness, all the brushes that need to be cleaned all the time, charcoal, ink and whatever you’d like to use? One machine for every size, shape and material of canvas, for every color and way of blending? Everything neatly placed on your desk, with the option to save for later? A dream tool for lazy people!

Computers are also well known for their function of automating boring and time-consuming processes. For example, you give it ten big numbers to multiply, and get a result without any effort on your side. In the same way you can create a brush (one not similar to anything traditional) of a tree, and create a whole forest with simple clicks. Click, click, click—and there you are, every tree perfectly detailed. All in a matter of seconds. Want to create a gradient for the sky? No problem—select white and blue, and it just creates itself. Did the character turn out to be too small? Don’t worry, just scale it. Or use a special deform tool to change its shape without having to draw it again. Everything without affecting the background—we’ve got layers, after all. It’s too easy. Too easy to be called art.

1

Try to do the same with traditional painting!
Here’s the problem: a computer isn’t an art tool. It’s not a substitute for a brush, or canvas. It’s a set of tools that lets you create an image of reality in the same format as photos. That’s all. Does it make the creation process more convenient? Yes. Does it make it easy? No.

To understand it, you need to get familiar with the concept of art media.

Traditional Media

Sculpting

In sculpting you use some solid material to create a 3D object, usually resembling something known from reality (or imagined reality, like movies or books). These materials should be prone to some kind of crafting so that their form can be adjusted. These are materials like:

  • Clay
  • Stone
  • Metal
  • Plastic
  • Bone
  • Wood
  • Ice
  • Glass

2

Sculpture—Super Sculpey polymer clay, toothpick

Drawing

In this method the outcome is made of lines that symbolize some form known from reality. It’s characteristic that dry media are used—you need to make the blending yourself with lines or a kind of dithering. Almost any material can be used for it, as long as it’s applied with a pointed stick on a material that can keep it for a time (paper, wood, or the human body).

  • Graphite
  • Marker
  • Ink
  • Crayon
  • Paint
  • Pastel

4

Traditional drawing—Progresso woodless pencil, 8B

Painting

In English, “painting” and “drawing” are often used as synonyms. However, a simple distinction can be that we use sharp lines for drawings and blobs/patches of paint for paintings. Overall colors, light and shadow, and the shapes made by it are more important here than clear outlines. Wet media are usually used, and the blending tends to occur naturally. For painting we can use:

  • Oil paint
  • Acrylic paint
  • Gouache
  • Ink
  • Tempera
  • Watercolor

6

Traditional painting—acrylic paint, canvas paper, two brushes

Digital Media

Digital media will be everything that has a digital outcome, that is, “in the form of digits”. When you take a photo of your painting, it becomes digital too (of course, only the photo, not the physical original). That’s what links all digital creations—nothing more. We still can distinguish other categories here:

Sculpting

Digital sculpting is about creating 3D models of something known from reality with a software that provides tools for it. The models can be textured and colored, and presented in a light that resembles a realistic environment. Finished works can be brought into a traditional form with a 3D printer.

Drawing

Digital drawing can be created with software that lets the user create dots of various diameter, which transform into lines. Additionally, other features can be used, like colors, erasers, and the transformation of drawn lines. Finished works can be then brought into the “real world” by printing.

Painting

Digital painting requires software that provides tools for creating patches of color and for blending them. Painting programs are usually a more advanced form of drawing software.